Mosaic | Main View
How Mosaic Works
When you first launch Mosaic you are in the main view. This is the view from which you enter the all other views in the app, such as the Edit or Jumble view.
The buttons at the bottom of this view are all described below.
Tiles
A Mosaic collage consists of tiles. Tiles may be empty or contain a photo. When you add a photo in the main view a new tile is created with the photo as its contents. Empty tiles can be added to the collage in the editor, and in the editor you can also add photos to empty tiles, or replace a tile's current photo with a new one.
Tiles are defined in terms of a unit size, and the proportions of a tile is specified as factors of that unit size, from 1 to 10. These are called the width and height factors of the tile, and you can change them using sliders in the editor view. Enter the editor mode by tapping the Edit button.
This is a unit tile, 1x1:
![]()
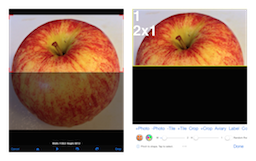
This is a 2x1 tile:

All new tiles are 2x2, and you can resize them in the editor.
Tiles have other properties which make up their metadata. These are: title, opacity, border width, border color and corner radius.
Title: text that is displayed as label.
Opacity: the translucency of the tile
Border Width: defines the width of a frame for the tile
Border Color: a color to draw the frame with, it make be partially transparent.
Corner Radius: the curvature of the corners of the frame
By default each tile displays its index. When photos are added to the collage from the main view they are always placed into the empty tiles by their index. But in the editor you can select the tile to which you can add a photo directly.
When you render the collage you have the option to include the index. If this option to draw the index is off, then the tile's label is drawn. Labels can be assigned to a tile in the editor.
Empty tiles are always drawn in the color orange. You can create a collage that simply consists of empty tiles. Then, with the option to render empty tiles and include their index, you can save the collage to a layout with an icon that is merely a thumbnail of the collage similar to the built-in layouts. This is how the built-in layouts were created.
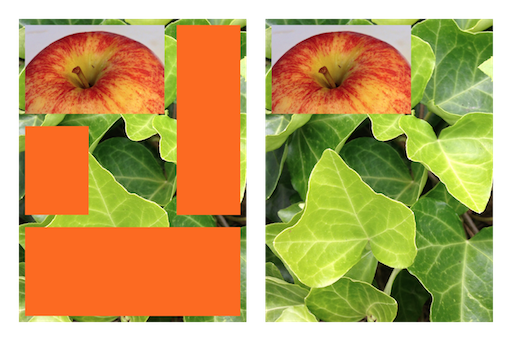
When a tile is empty, and you choose to not render empty tiles, the background will show instead. The background can be transparent, a color, a pattern of a thumbnail of an image, or a full image.
Here is an example of a collage with a background, with the option to render empty tiles on and off:
Collage
A collage is a collection of tiles arranged into a rectangular view. The dimensions of the collage determine how the tiles will fit inside it. At any given time the collage width and height is adjusted so that it just fits all the tiles. In other words the “bounding” rectangle of the collage is determined by the tiles.
Tiles are arranged left to right and top to bottom according to where they can “fit”. Mosaic tries to place each tile next to its preceding tile if its width will not extend beyond the right edge of the collage. Otherwise it will look for a space it can fit under the preceding tiles.
The collage is always displayed in the bounds of the device screen. But this is not the same size when you render the collage for output, say to save the collage to the camera roll. It is always scaled so that the largest output is achieved: The size will be maximized constrained by available memory and the collage size selection for megapixels in the Share menu.
The proportions of a collage will automatically change when the current collage dimensions cannot fit the tiles.
You can pinch the collage horizontally to fit more tiles horizontally, and pinch it vertically to fit more vertically. As you grow the collage widthwise, its height will also change, and vice verse. But the collage can at most be as high or wide as there are tiles.
You can change the coordinate system for a collage. The purpose of this is only to support variations of a given layout based on its orientation, as shown here. There are 5 types of common coordinates:

Layouts
Layouts consist of collage dimensions, background color or pattern and tile spacing and all the tile data which consists of tile proportions and metadata. Metadata consists of the tiles title, border width and color, opacity (alpha), and corner size.
A layout does not store any background photo for the collage though. The background photo is just considered a property of the app itself - or the main view itself.
So a layout defines what a collage looks like geometrically. It does not contain any photos. You add photos to a layout, and that makes a complete collage.
Therefore a layout is applied to the photos of the collage, and you can change it without changing the photos. On the other hand you can display a layout with no photos at all. This is useful when saving a collage as a layout since the icon for the template is just a thumbnail image of the collage.
Mosaic has a set of “built-in” layouts, and you can also make your own in the editor.
When a collage is rendered for output the proportions of a tile are scaled so that the largest collage is created. So, it does not matter how small a tile may appear on screen, only the proportions matter.
Mosaic always displays the whole collage on screen. But the actual size of the collage generated when you render it is only limited by available memory, and controllable by the selection you make for collage size in the Share menu. You can view the collage by using the preview button, then you can zoom in using pinching and double tap.
All of the built-in layouts were created in Mosaic. Sample built-in templates:
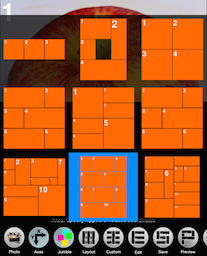
You can create your own layouts simply by saving any collage as a layout from the Save button. Its icon is simply a thumbnail of that collage.
When you apply a template you have the option of not applying the metadata stored in the layout, but rather preserve the metadata a tile already contains. This option is in the Look menu.
Photos
When you add a photo to a tile by default it is scaled to fit the tile. Here is the same photo place into the above two tiles:
![]()
On the other hand, in the Look menu you can choose to have the photos scaled to completely fit inside the tile In this case the collage will look like this:
![]()
There is also an option to not crop the photo to the bounds of the tile, so it may extend outside its border. In this way photos will possibly overlap in the collage. If a tile is empty it shows in orange. When you render the collage you have the option to draw the empty tiles as orange, or transparent. When a tile is drawn transparent anything under it, such as the background photo or color of the collage, will show. This option is set in the Share menu.
It is useful to be able to draw empty tiles when a thumbnail is created for a custom layout.
When you add a photo from the main view it is placed inside a new 2x2 tile. In the editor you can preselect the size of a new tile, and change its size afterwards.
Editor
The editor is where you add and remove tiles, and set the proportions and metadata for tiles. You can also add and remove photos from tiles in the editor. When a tile has a photo you can edit the tile photo to crop it, rotate it, frame it, add text labels to it, etc.
Open the editor by tapping the Edit button. You can add photos to selected tiles in the editor. You can also crop photos in the editor. In particular you can use the +Crop button to select a photo to crop, or tap the Crop button to crop the existing photo. Crop always sets the crop region proportions to match the tile, but you may reshape it if you like.
Main View Buttons
Photo: Presents a menu to add photos from your saved photos, the camera or the clipboard. Photos added display inside new or currently empty tiles.
The Photo menu item “Do Not Use High Res Image” is an option to use lower resolution images from the camera roll when available, saving memory.
The option “Crop Photos For Aviary” ensures that when you use Aviary to add frames, text and other edits they will be not be cropped by the tile. This is done by cropping the photo to the tile proportions. Therefore it is best to use Aviary when the final shape of the tile has been determined. But if you selected the Look menu option 'Do Not Scale Photos To Fit', or 'Do Not Clip Photos To Bounds', then cropping for Aviary is not necessary.
The option “Only Swap Photos” applies to drag and drop of tiles on themselves. If this option is off then metadata for the tile will be swapped with the photos. Metadata is : title, opacity, border width, border color and corner radius. It is not tile width and height factors.

Axes: These options set the coordinate system as described above. This enables you to use a rotated or flipped version of a layout. These menu items are adjectives and not verbs - and they cannot be composed. In particular you cannot use them to rotate a layout 180º.
Jumble: This mode of Mosaic randomly places the centers of each tile in the view. You can then drag them around within the view to move them. Jumble will use the background currently set when you enter Jumble. The collage will always have the same proportions as the view, and as usual its size will be maximized constrained by available memory and the collage size selection for megapixels in the Share menu.

Layout: Apply a built-in layout by tapping on one of the icons displayed in a grid. For your convenience there are quite a few to pick from. You can then add photos or edit the layout in the editor. If there are more photos than tiles in the layout, then more tiles are added to the layout. If there are less, some layout tiles will be empty, that are colored orange. All the built-in templates and their icons were created by Mosaic.
There is an important option that relates to applying layouts: In the Look menu is an option called “Preserve Tile Metadata”. When this option is on and you apply a layout the metadata stored in the layout for a tile is not used. Instead the existing tile metadata that corresponds to the tile in the layout, by index, will be copied to the layout tile, preserving the title, opacity, border width, border color and corner radius.

Custom: A library of layouts you created. Any collage can be saved as a layout, with its icon generated as a thumbnail of the current collage.
You save the current collage to a layout using the Save menu item Layout. Since the icon for the new template is created as a thumbnail of the collage it is customary to not include photos in the collage.
A layout will store all tile width and height factors, the background color or pattern (not background photo), the collage proportions, and all tile metadata.
There is an important option that relates to applying layouts: In the Look menu is an option called “Preserve Tile Metadata”. When this option is on and you apply a layout the metadata stored in the layout for a tile is not used. Instead the existing tile metadata that corresponds to the tile in the layout, by index, will be copied to the layout tile, preserving the title, opacity, border width, border color and corner radius.

Edit: In layout editor add and delete tiles, set their proportions (width and height factors), add photos to selected tiles, set tile properties (metadata) and edit their photos in Aviary. Apply random properties to all tiles at once and more. See the info page for the Editor for more detail.

Save: Create a layout using the current collage or save the collage to camera roll. A layout is a template for tile arrangement and properties: proportions, border, alpha, corner radius and position. A layout icon is created as a thumbnail of the collage, so it is easy to remember what it looks like.
If you want to attach the rendered collage to an email or message use the Share menu instead, see below.

Preview: Renders the maximal collage and presents it in a scrolling-zooming view. Scroll and zoom in by panning, pinching and double tapping the collage. A single tap dismisses preview.

List: Displays all the current photos in the collage. You can reorder and delete photos from this view.
Note that empty tiles are included. Empty tiles all have the same photo in them: an orange rectangle. When the collage is rendered you have the Share menu option “Render Empty Tiles” to include these orange photos or not. This is useful when creating a thumbnail for a layout generated from a collage with no photos in it.
Background: Set the background transparent, to a specific color, a tiling of a thumbnail of a photo on the clipboard, or the set the whole background to the clipboard or camera roll photo. The background appears through the space determined by tile spacing and empty tiles (when render with option to not render empty tiles is on).
Important note for background photos:
The background always fills the view, centered in the view and scaled to fill it preserving its proportions. The same is true when rendering the collage - but in this case the view will be the collage view, which is the smallest bounding rectangle of the tiles. Therefore the part of the background displayed in the screen view will not match that in the rendered collage. Use preview to see how it will actually appear.
The background is not stored in a layout.
You can always reload a background photo that was previously loaded using the “Reload Last Background” menu item.
Use the “Edit Last Background And Set” to open the last background photo set in Aviary.
Pinch: Choose to pinch vertically and horizontally to reshape collage. Or to set the spacing between tiles, which is also called “border” because the tile spacing creates a visual border around the photos if the background is colored. The collage background always shows through the tile spacing.

Look: This menu provides some options related to how the collage looks.
Select “Do Not Preserve Tile Metadata” if you want the layout tile metadata applied to any existing tiles in the collage. Otherwise the current metadata is copied to each corresponding existing tile.
Select “Delete Custom Layout” to remove one of your own layouts. You can remove all at once using “Delete All Custom Layouts”
“Show Labels & Hide Indices” determines if each tile displays its index or its title. You set the title (label) in the editor. In the Share menu you have the option to render the index label - this is useful when creating a thumbnail for the layout of a collage.
“Do Not Clip Photos To Bounds” specifies if you want to allow the photo to extend beyond the boundary of its tile to show the whole photo. This is a special effect.
“Scale Photos to Fit Tiles” specifies if you want the whole photo scaled to fit inside the tile - so it is the opposite of the preceding option. If this option is on, and the photo does not have the same proportions as the tile, then parts of the tile will be transparent.
If this option is off the photo is scaled to fill the tile preserving the proportions of the photo, i.e., its “aspect ratio.”
Use “Reset Collage” to restore default values of all values for the collage - i.e., the “default” layout, which is the “factory” settings. Reset will not remove existing photos. Although the background is set to transparent you can still restore to the previous background you set from the Background menu.

Share: Renders the biggest collage for export. Mosaic renders the largest collage using the megapixel selection in the Share menu and available memory.
You have the option to draw empty tiles and include the tile index label - useful for layout icons. You can export to messages, saved photos, email, a printer and more.
The “Collage Size” is specified in megapixels - “MP”. But the collage size is in actuality limited by available memory on the device.
The available memory is constantly changing as the app is running. Therefore the collage will not always be rendered to the same size, but to the maximal size possible at the time.
The memory available for rendering is always displayed in the main view - in the upper left corner of the button bar at the bottom.
© 2014 Limit Point LLC. All rights reserved.